It's been too long since my last post! Bear with me, I take a really long time writing these posts and documenting everything but over time I will get a lot quicker.
Today I spent the entire morning finishing up the book Getting Started with Arduino by Massimo Banzi, the co-founder and co-creator of Arduino. I highly recommend this book to anyone else starting to tinker with arduinos. The book explains the different functions and coding style of the arduino language and teaches you through very simple examples the thinking process of how to write these sketches and how to prototype using a solderless breadboard. I really liked that Massimo keeps you engaged through really simple material and got me excited to play some more with these awesome microcontrollers.
I worked through all the simple projects and now I am posting about the last big project of this book, the Arduino Networked Lamp. This project is somewhat like a mood lamp for articles from your favorite site and measures how much light is in the room. This example project combines the smaller projects such as: wiring and coding an LED to shine, using pushbuttons to turn on and off an LED, and using a photo resistor to detect light. This lamp connects to the internet and reads through the RSS feed of any site of your choice. From the feed, it counts the instances of certain words of your choice. In the book, it'll have you look for the words: peace, love, arduino, from the make magazine website. I ran into a few bugs here because the make magazine site doesn't want to let me tap into the RSS feed so I choose another site- Muscle and Fitness Magazine (I also tried T-nation, my favorite fitness article site, but they took their RSS feed down, so sad). After keeping a count for each word, the program converts each count into a hexadecimal integer (a color value) and the arduino converts it into bytes. The bytes takes the bytes and assigns each measurement to a color: red, green, blue. The color is then displayed on an RGB LED that can be turned on or off by a pushbutton. But wait! That's not all! This project has also wired in a photo resistor sensor to detect how much light the device is receiving and records it in the serial port of the arduino. This is a pretty interactive project for a beginner, but its a good step toward trying to build sensors that will display data on my laptop.
First, we'll start off with the coding of the computer app to display the count data and light brightness. We'll be using another type of coding language that can be used in adjunct to the arduino coding language, called Processing (link to download: https://www.processing.org/download/?processing
) . It is a java based coding language that makes it easier to code up programs that allow us to see arduino measurements on our computers. The language is pretty similar to arduino C based code so in that sense transitioning over won't be so much of a pain. With Processing, we will be creating a Proxy that will download the RSS feed from muscleandfitness.com and extract all the words from the resulting XML file. Then it'll go through everything and count the instances of the words "workout", "pound", and "train". From those numbers, it will calculate a color value and send it over to the arduino. The arduino will send back to the program the amount of light measured and the program will display it on screen.
// Processing Code for Java Program

import processing.serial.*;
import java.net.URL;
import java.net.URLConnection;
import java.io.BufferedReader;
import java.io.InputStreamReader;
import java.util.StringTokenizer;
String feed = "http://www.muscleandfitness.com/features";
int interval = 10; // retrieve feed every 60 seconds;
int lastTime; // the last time we fetched the content
int workout =0;
int pound=0;
int train=0;
int light =0;  // light level measured by the lamp
Serial port;
color c;
String cs;
String buffer = "";
PFont font;

void setup() {
  size(650,490);
  frameRate(10);  //don't need fast updates
  font = loadFont("HelveticaNeue-Bold-32.vlw");
  fill(255);
  textFont(font, 32);
  // IMPORTANT NOTE:
  // The first serial port retrieved by Serial.list()
  // should be your Arduino. If not, uncomment the next
  // line by deleting the // before it, and re-run the
  // sketch to see a list of serial ports. Then, change
  // the 0 in between [ and ] to the number of the port
  // that your Arduino is connected to.
  println(Serial.list());
  String arduinoPort = Serial.list()[0];
  port = new Serial(this, "/dev/tty.usbmodem1411", 9600); // connect
  lastTime = 0;
  fetchData();
}

void draw() {
  background( c );
  int n = (interval - ((millis()-lastTime)/1000));
  // Build a colour based on the 3 values
  c = color(workout, pound, train);
  cs = "#"+ hex(c,6);
  text("Arduino Networked Lamp", 10,40);
  text("Reading feed:", 10, 100);
  text(feed, 10, 140);
  text("Next update in "+ n + " seconds",10,450);
  text("workout" ,10,200);
  text(" " + workout, 130, 200);
  rect(200,172, workout, 28);
  text("pound",10,240);
  text(" " + pound, 130, 240);
  rect(200,212, pound, 28);
  text("train",10,280);
  text(" " + train, 130, 280);
  rect(200,252, train, 28);
  // write the colour string to the screen
  text("sending", 10, 340);
  text(cs, 200,340);
  text("light level", 10, 380);
  rect(200, 352,light/10.23,28);
  if (n <= 0) {
    fetchData();
    lastTime = millis();
  }
  port.write(cs);
  if (port.available() > 0) {
    int inByte = port.read();
    if (inByte != 10) {
      buffer = buffer + char(inByte);
    }
    else {
      // newline reached, let's process the data
      if (buffer.length() > 1) {
      //chop off last character, its just a repeat
      buffer = buffer.substring(0,buffer.length() -1);
      // turn the buffer from string into an integer number
      light = int(buffer);
      // clean the buffer for the next read cycle
      buffer = "" ;
      // We're likely falling behind in taking readings
      // from Arduino. So let's clear the backlog of
      // incoming sensor readings so the next reading is
      // up-to-date.
      port.clear();
    }
  }
}
}

void fetchData() {
  // we use these strings to parse the feed
  String data;
  String chunk;
  // zero the counters
  workout = 0;
  pound = 0;
  train = 0;
  try {
    URL url = new URL(feed);
    // prepare a connection
    URLConnection conn = url.openConnection();
    conn.connect();
    BufferedReader in = new
    BufferedReader(new InputStreamReader(conn.getInputStream()));
    // read each line from the feed
    while ((data = in.readLine()) != null) {
      StringTokenizer st =
        new StringTokenizer(data,"\"<>,.()[] ");
      while (st.hasMoreTokens()) {
       // each chunk of data is made lowercase
      chunk= st.nextToken().toLowerCase() ;
     if (chunk.indexOf("workout") >= 0 )
       workout++; // increment love by 1
     if (chunk.indexOf("pound") >=0)
       pound++;
     if (chunk.indexOf("train") >= 0)
       train++;
      }
    }
    if (workout > 64)   workout = 64;
    if (pound > 64)    pound = 64;
    if (train > 64) train = 64;
    workout = workout * 4;
    pound = pound * 4;
    train = train * 4;
  }
  catch (Exception ex) {
    ex.printStackTrace();
    System.out.println("ERROR: "+ex.getMessage());
  }
}
|
I added a couple lines of code in the beginning since the program did not understand what the URL function was without these few lines. I added the following on the left. Turns out the issue was that it needed to import some extra Java classes in order to recognize the URL function and some other functions used in the code.
|
Now moving on to writing the Arduino code!
The arduino code is a lot shorter. Most of the code is defining variables and pins that will be used. The setup loop simply sets up the serial monitor to run and declares the pushbutton as an input. In the loop function, it reads the light sensor and reports the value to the serial monitor and relays it to the java program running on screen. Then the arduino moves onto converting the hexidecimal values received from the program into bytes and assigns these values to each color r,g,b. Then it checks if the pushbutton has been pressed to indicate that the LED should be on and writes the values to each color.
The arduino code is a lot shorter. Most of the code is defining variables and pins that will be used. The setup loop simply sets up the serial monitor to run and declares the pushbutton as an input. In the loop function, it reads the light sensor and reports the value to the serial monitor and relays it to the java program running on screen. Then the arduino moves onto converting the hexidecimal values received from the program into bytes and assigns these values to each color r,g,b. Then it checks if the pushbutton has been pressed to indicate that the LED should be on and writes the values to each color.
//Arduino Code for the Arduino Networked Lamp

#define SENSOR 0
#define R_LED 9
#define G_LED 10
#define B_LED 11
#define BUTTON 12
int val =0; //variable to store the value coming from the sensor
int btn = LOW;
int old_btn = LOW;
int state = 0;
char buffer[7];
int pointer = 0;
byte inByte = 0;
byte r = 0;
byte g = 0;
byte b = 0;

void setup() {
  Serial.begin(9600); //open up serial port
  pinMode(BUTTON, INPUT);
}

void loop() {
  val = analogRead(SENSOR);
  Serial.println(val);

  if (Serial.available() >0) {
    //read incoming byte
    inByte = Serial.read();
    if (inByte == '#') {
      while (pointer < 6) {
        buffer[pointer] = Serial.read();
        pointer++;
      }
      //now need to decode 3 numbers of colors stored as hex numbers into 3 bytes
      r = hex2dec(buffer[1]) +hex2dec(buffer[0])*16;
      g = hex2dec(buffer[3]) +hex2dec(buffer[2])*16;
      b = hex2dec(buffer[5]) +hex2dec(buffer[4])*16;
      pointer = 0; //reset pointer
    }
  }
  btn = digitalRead(BUTTON);
  //check if there was a transition
  if ((btn == HIGH) && (old_btn == LOW)) {
    state = 1-state;
  }
  old_btn = btn; //val is now old,lets store it
  if (state == 1) {
    analogWrite(R_LED, r);
    analogWrite(G_LED, g);
    analogWrite(B_LED, b);
  }
  else {
    analogWrite(R_LED, 0);
    analogWrite(G_LED, 0);
    analogWrite(B_LED, 0);
  }
  delay(100);
}
int hex2dec(byte c) {
 if (c >= '0' && c<= '9') {
  return c- '0';
 } else if (c >='A' && c <= 'F') {
  return c - 'A' + 10;
 }
}
In order to get this to work, you first need to upload the arduino code to your wired arduino. Then you want to go back to the Processing code and make sure the program is connected to the right arduino port. As the important note in the Processing code states, usually the first serial port is your arduino port. Sometimes that isn't the case (like mine) so you have the program print out all the serial ports for the arduino. Pick the name that matches the port you used to upload the arduino code to the arduino and write the name to the line of code below:
(Note: you'll find the printed serial ports at the bottom of the Processing environment where it shows you the messages about your code)
(Note: you'll find the printed serial ports at the bottom of the Processing environment where it shows you the messages about your code)
|
In my case, the correct name of my arduino serial port is: /dev/tty.usbmodem1411
|
|
Now you can run the Processing code and you'll get something like this:
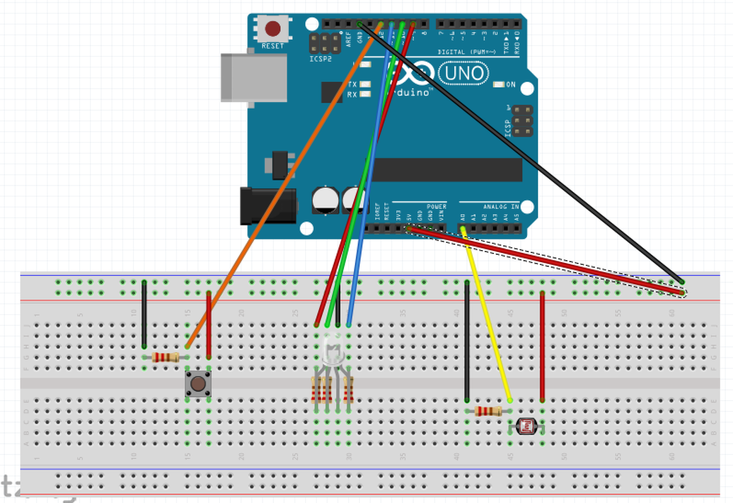
It'll change colors as the word count changes. It'll also show you the color value it is sending to the LED and the light level the arduino is sending the program back. At the very bottom a countdown is displayed, telling you every 10 seconds that it will update the count and light reading. Lets not forget about the actual arduino wiring! Here's a sketch of how I wired the lamp together. All the resistors used are 10K ohm resistors but I used 330 ohm resistors for the LED so it would shine brighter (don't worry there wont be enough voltage to blow anything out). |

|

 RSS Feed
